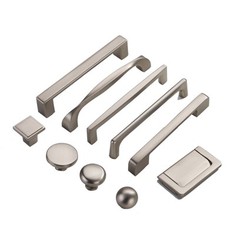
Modern Kitchen Handles For Cabinets
Material: Zinc alloy
CC: 96mm/128mm/160mm/192mm or customized
Color: Black, gold, white, bronze, silver or customized
Finish: Chrome, Chrome, Matt nickel, gold
Lead time: Abt. 25-30 days, depends on quantity
Service: OEM/ODM
Sample: Available
Description
Technical Parameters
modern kitchen handles for cabinets
Modern cabinet pull handles are defined by clean lines, minimalist profiles, and a focus on functionality. They are the jewelry of the kitchen, adding a sleek, contemporary touch.

Defining Characteristics of Modern Pull Handles
Clean, Simple Lines: Avoid ornate details. Think straight edges and gentle curves.
Minimalist & Uncluttered: The design is streamlined and not busy.
Thin Profiles: Often slimmer and less bulky than traditional pulls.
Matte & Satin Finishes: Brushed and matte finishes are favored over high-shine polished ones.
Top Modern Cabinet Pull Handle Styles
This is the quintessential modern handle. A straight, unadorned bar.
Why it's popular: Ultra-versatile, works with any modern or transitional kitchen. Creates a clean, continuous line.
Finishes: Matte Black, Brushed Nickel, Satin Brass, Polished Chrome.
Best for: A timeless, clean look.
Edge Pulls / Lip Pulls (Ultra-Minimalist)
A recessed or applied channel along the top edge of the drawer or door. Offers a near-invisible, integrated look.
Why it's popular: Creates a true "handle-less" aesthetic while still providing a grip. Maximizes the minimalist vibe.
Finishes: Typically matches the cabinet color (e.g., a black pull on a black cabinet).
Best for: Achieving a sleek, high-end, minimalist kitchen.

3. T-Bar Pulls (Industrial-Modern)
Features a distinctive "T" shape. It adds a slight geometric edge while maintaining a simple form.
Why it's popular: Adds a touch of industrial character without being overpowering.
Finishes: Matte Black, Brushed Steel, Iron.
Best for: Loft-style apartments or modern kitchens with an industrial edge.
4. Arch Pulls (Soft-Modern)
A handle with a gentle, graceful arch. It softens the strict geometry of modern design.
Why it's popular: Adds a touch of elegance and ergonomic comfort while still feeling contemporary.
Finishes: Satin Brass, Brushed Nickel, Matte Black.
Best for: Transitional or "soft-modern" kitchens that aren't too stark.

Popular Modern Finishes for 2024
|
Finish |
Vibe & Style |
Pairs Well With |
|---|---|---|
|
Matte Black |
Bold, dramatic, high-contrast. |
White, Gray, Navy, Green, and Wood-tone cabinets. |
|
Brushed Nickel / Satin Nickel |
Soft, versatile, warm gray tone. |
The most popular and safe choice for modern kitchens. |
|
Satin Brass / Brushed Gold |
Warm, luxurious, contemporary. |
Navy, Green, Black, or White cabinets. |
|
Polished Chrome |
Bright, reflective, classic modern. |
Adds a bright, clean accent. |
|
Graphite Gray |
A softer alternative to black, very sophisticated. |
All light and dark cabinet colors. |
Sizing & Proportion Guide
Getting the size right is crucial for a modern look. The rule is longer and leaner.
For Standard Drawers: Use pulls that are 5" to 8" long.
For Large/Wide Drawers: Use longer pulls, from 10" to 12" or even longer.
For Pantry Doors: 12" to 18" pulls make a bold statement.
The Rule of Thirds: A pull should be approximately 1/3 the total width of the drawer front for perfect visual balance.
Pro Tips for a Cohesive Look
1.Mix and Match with Knobs: A popular modern trend is to use pulls on drawers and knobs on cabinet doors. This adds visual interest while maintaining a clean look.
2.Consistent Placement is Key: For a truly modern look, ensure all handles are installed in the exact same position on every door and drawer. Use a template!
3.Coordinate with Other Fixtures: Match your pull handle finish to your faucet, light fixtures, and appliance handles for a polished, intentional design.
4.Sample Before You Buy: Order a single handle in your top 2-3 finishes. See how it looks and feels in your kitchen's lighting and against your cabinet color.
The simple, thin bar pull in a Matte Black or Brushed Nickel finish is the most versatile and safest choice for a modern kitchen. It's timeless, widely available, and works with virtually any color scheme.
Final Pro Tip: The simplicity of modern handles means that quality and precise installation are paramount. Any imperfections in alignment will be highly noticeable. Invest in good quality hardware and take your time with installation.
how to install pull handles on cabinets???
Installing pull handles on cabinets is a straightforward DIY project that makes a huge impact. The key to a professional look is perfect alignment.
Here is a foolproof, step-by-step guide.
The Golden Rule: Use a Template
A template ensures every handle is placed in the exact same spot. You can buy an inexpensive hardware installation jig or make your own from cardboard.
What You'll Need
Cabinet handles/pulls
Template (crucial for consistency)
Drill & Drill Bits
Painter's Tape or Masking Tape
Tape Measure
Pencil
Awl or Nail (for starting a pilot hole)
Level
Screwdriver
Step-by-Step Installation Guide
Step 1: Plan Your Placement
Decide on a consistent placement rule for your kitchen.
For Drawers: Center the handle both vertically and horizontally on the drawer front.
For Cabinet Doors: Place the handle in the corner opposite the hinges.
Upper Cabinets: 2-3 inches from the bottom corner.
Lower Cabinets: 2-3 inches from the top corner.
Step 2: Create or Secure Your Template
DIY Template: Take a piece of cardboard. Mark your handle's center-to-center distance (the space between the screw holes). Drill two holes in the template at this exact measurement.
Pre-made Template: Use an adjustable hardware jig from a hardware store.
Step 3: Position and Secure the Template
Hold the template against the cabinet door or drawer in your chosen spot.
Use a level to ensure the template is perfectly straight. Do not rely on the cabinet's edge being level.
Once level, secure the template firmly with painter's tape to prevent slipping.
Step 4: Mark the Drill Holes
Push your pencil through the holes in the template to mark the drilling spots on the cabinet.
Create a Pilot Dent: Use an awl or a nail to gently tap a small starter hole on each mark. This prevents the drill bit from slipping.
Step 5: Drill the Holes
Select a drill bit that is slightly smaller than the diameter of your handle's screws.
Hold the drill perpendicular (at a perfect 90-degree angle) to the cabinet surface.
Drill slowly and steadily through the pilot dents.
Pro Tip: Place a piece of painter's tape over the mark before drilling to prevent wood splintering.
Step 6: Attach the Handle
Insert the screws from the inside of the cabinet door or drawer through the new holes.
Align the handle with the screws.
Use a screwdriver to tighten the screws until the handle is snug.
Caution: Do not overtighten, as this can strip the wood or damage the handle.
Step 7: Repeat with Precision
Do not move the template until you have drilled all identical cabinets (e.g., all upper cabinet doors).
For a different cabinet type (e.g., base cabinet doors), reposition the template using the same measuring method.
Pro Tips for a Flawless Finish
Install One Handle First: Completely install one handle on a door and one on a drawer as a test. Open and close them to ensure the placement feels comfortable and natural before drilling all cabinets.
Check Screw Length: Ensure the screws provided are the correct length for your cabinet door thickness. If they are too long, they can be carefully cut with a hacksaw.
Work in an Assembly Line: Mark all holes, then drill all holes, then attach all handles. This is more efficient and ensures consistency.
Common Mistakes to Avoid
Skipping the Template: Freehand measurements will result in misaligned handles. This is the most common error.
Drilling at an Angle: This causes the handle to sit crookedly.
Not Using a Level: Cabinet edges aren't always perfectly straight.
Overtightening Screws: This can crack the wood or strip the screw threads.
Conclusion
Installing pull handles is an easy and rewarding project that instantly upgrades your kitchen or bathroom. By using a template and working carefully, you can achieve a professional, custom look.
Final Pro Tip: If you are installing handles on new, unfinished cabinets, drill the holes before painting or staining for the cleanest possible finish.
Hot Tags: modern kitchen handles for cabinets, China modern kitchen handles for cabinets manufacturers, suppliers
Send Inquiry