


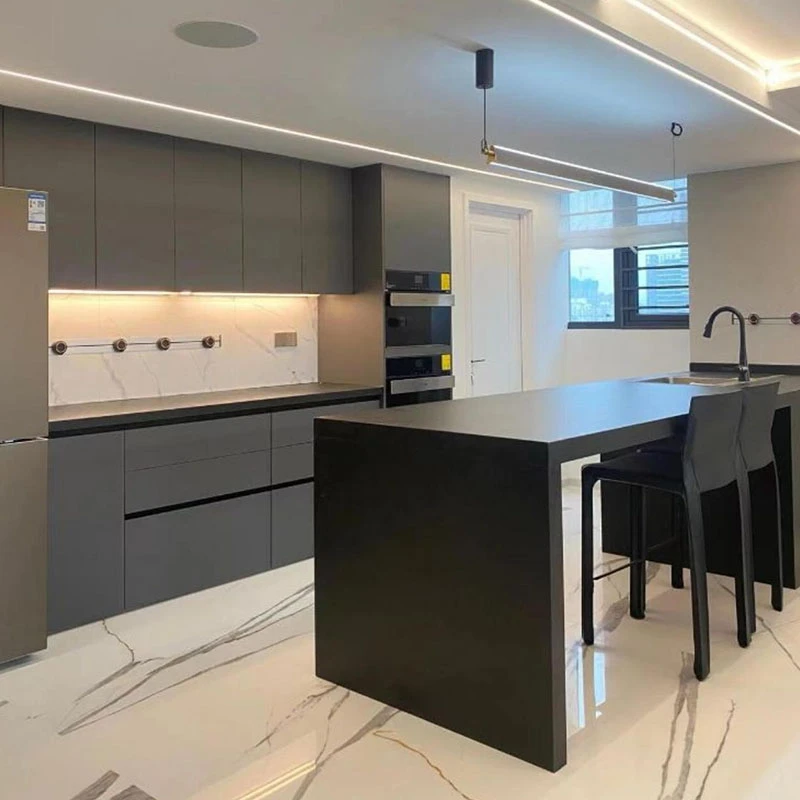


Gray Cabinets Granite Countertops
Color: Customized
Material: Granite or Quartz
Size: Customized
Application: Kitchen, Bathroom
Service: OEM & ODM
Sample: Available
Description
Technical Parameters
gray cabinets granite countertops

Elevate Your Kitchen with Gray Cabinets & Granite Countertops: Timeless Elegance, Unmatched Durability
Crafted for discerning homeowners who value both aesthetics and functionality, our Gray Cabinets with Granite Countertops collection merges sophisticated design with the enduring strength of natural stone. This combination is a cornerstone of modern kitchens, offering versatility that complements any architectural style-from industrial lofts to coastal retreats. Below, we detail the material properties, maintenance essentials, design advantages, and care protocols that make this pairing an investment in lasting beauty.
Material Properties: Nature's Engineering at Its Finest
Granite's Geological Brilliance:
Composition: Formed deep within the Earth's crust, granite is an igneous rock composed of interlocked minerals-predominantly quartz (25–40%), feldspar (50–60%), and mica (3–10%)-resulting in exceptional hardness (6–7 on the Mohs scale) and heat resistance (withstanding temperatures up to 1,200°F).
Gray Granite Varieties: Our collection features globally sourced stones like Silver Cloud, Grey Pearl, and Impala Black, each with unique veining and speckling that ensures no two slabs are identical. Gray tones range from soft charcoal to shimmering metallic, adapting to both cool and warm color palettes.
Cabinetry Construction:
Premium Materials: Gray cabinets utilize moisture-resistant engineered wood or hardwood frames, finished with matte, gloss, or textured laminates that resist scratches and humidity.
Eco-Conscious Options: Low-VOC paints and formaldehyde-free adhesives ensure indoor air quality and sustainability.
Design Advantages: Where Aesthetics Meet Functionality**
1. Visual Harmony & Flexibility:
Monochromatic Sophistication: Pair light gray cabinets with Bianco Sardo granite for a Scandinavian-inspired clean look, or opt for dark gray cabinetry with Absolute Black countertops to create dramatic, high-contrast luxury.
Texture Play: Combine honed granite (matte finish) with high-gloss cabinets for tactile depth, or match leathered granite with shaker-style cabinets for rustic-industrial appeal.
2. Space Optimization:
Small Kitchens: Light gray cabinets and reflective polished granite amplify natural light, enhancing perceived space.
Large Islands: Waterfall-edge granite countertops (3–4 cm thickness) paired with charcoal gray cabinetry create a bold, seamless focal point.
3. ROI & Market Appeal:
Granite countertops yield ~70% return on investment in home resale value, while gray cabinets rank among the top 3 preferred kitchen colors in 2025 luxury home surveys.
Maintenance Essentials: Preserving Beauty for Decades
Daily Care Protocol:
Cleaning: Use pH-neutral soap and warm water with microfiber cloths. Avoid vinegar, bleach, or abrasive pads-acidic substances etch granite's surface, while abrasives dull its polish.
Spill Management: Wipe wine, oils, or citrus immediately to prevent staining. Blot-don't rub-to protect the sealant.
Sealing & Protection:
Frequency: Reseal every 1–3 years using solvent-based impregnators (e.g., Tenax Hydrex), which penetrate deeply without altering granite's natural appearance. Test annually with the water bead test: if absorbed in <15 minutes, reseal.
Stain Remediation:
Oil stains: Apply baking soda paste overnight.
Organic stains: Use hydrogen peroxide and diatomaceous earth poultice.
Cabinet Care:
Clean surfaces with mild detergent; avoid silicone-based polishes that attract dust.
Lubricate hinges annually with silicone spray to prevent squeaking.
Critical Care Warnings
Heat & Impact: While granite withstands hot pans, always use trivets to prevent thermal shock. Avoid dropping heavy objects-chips require professional epoxy repair.
Seam Integrity: Seal countertop seams with color-matched epoxy to block moisture intrusion, especially near sinks.
Chemical Risks: Never use plumber's putty (oil-based) near sinks; opt for silicone caulk instead.
Why This Pairing Endures
Our gray cabinets and granite countertops transcend trends by offering:
Durability: Granite's resistance to scratches, heat, and impact outperforms alternatives like dolomite or quartzite.
Adaptability: Gray's neutrality allows effortless style pivots-update hardware, backsplashes, or lighting without replacing countertops or cabinets.
Wellness Alignment: Non-porous, sealed granite inhibits bacterial growth, while gray's calming tones promote a stress-free cooking environment.
Conclusion: The Art of Practical Luxury
Gray cabinets and granite countertops are more than surfaces-they're a commitment to craftsmanship and resilience. Whether renovating a downtown penthouse or a countryside villa, this pairing delivers unmatched aesthetic flexibility and longevity. By adhering to simple maintenance rituals, your kitchen will remain a testament to elegant functionality for generations.
Explore our curated gallery or visit our Phoenix showroom to reserve your slab in person-nature's artistry deserves to be handpicked.
For project consultations or custom quotes, contact our design team at mino cabinet & stone.
how to attach a dishwasher to a granite countertop

To securely attach a dishwasher to a granite countertop, follow this detailed guide combining methods from industry experts. Granite's hardness and weight demand specialized techniques to prevent cracking and ensure stability.
Critical Precautions Before Starting
Verify countertop thickness: Standard granite slabs are 2–4 cm thick. Thinner slabs (2 cm) may require plywood backing for reinforcement.
Check dishwasher clearance: Ensure ½"–1" gap between the dishwasher top and countertop underside to avoid vibration damage.
Turn off utilities: Disconnect power and water supply to prevent accidents.
Materials & Tools Required
| Item | Purpose |
|---|---|
| Dishwasher brackets | L-brackets or granite-specific mounting kits (e.g., E-Z Dishwasher Mount) |
| Anchors & screws | Concrete anchors, toggle bolts, or #10–12 screws for granite |
| Drill & bits | Diamond-tipped masonry bit (¼"–⅜" diameter) |
| Level | Ensure dishwasher alignment |
| Silicone caulk | Seal seams against moisture |
Pro Tip: Use painter's tape on drill points to prevent bit slippage on granite,
Step-by-Step Installation
Method 1: Using Anchor Bolts (Most Secure)
Mark bracket positions:
Place dishwasher under countertop.
Mark 2–4 points 1" from counter edge for brackets.
Drill pilot holes:
Drill straight down at 90° using low speed (300–500 RPM) to avoid cracking.
Depth: ¾"–1" (never exceed ⅔ slab thickness).
Insert anchors:
Tap plastic anchors into holes until flush.
Attach brackets:
Secure L-brackets with screws, avoiding overtightening.
Mount dishwasher:
Slide dishwasher onto brackets and tighten screws through its top frame.
Method 2: No-Drill Kits (Ideal for Thin Granite)
Use adhesive-backed brackets (e.g., Granite Countertop Dishwasher Installation Kit):
Clean counter underside with alcohol.
Affix brackets to granite using industrial adhesive.
Clip dishwasher into brackets.
Critical Considerations for Granite
Support overhangs:
If countertop spans >24" without cabinets, add steel support brackets under granite to prevent sagging.
Seam sealing:
Apply silicone caulk along edges where countertop meets dishwasher to block water intrusion.
Leveling:
Adjust dishwasher feet until unit is perfectly level (use bubble level front-to-back and side-to-side).
Common Mistakes to Avoid
Using wood screws: Standard screws strip granite; always use concrete/masonry anchors.
Ignoring vibration pads: Place rubber pads between brackets and dishwasher to reduce noise.
Over-tightening: Granite cracks under pressure-tighten until snug, then stop.
When to Call a Professional
Complex scenarios:
Thickness <2 cm, large overhangs (>12"), or intricately edged countertops.
Cost: Professional installation averages 150–400 but prevents costly damage.
Key Takeaway: For most installations, anchor bolts with L-brackets offer the sturdiest solution. Always prioritize slow drilling, precise leveling, and moisture sealing to protect your granite investment.
how to change granite countertops without replacing

Here's a comprehensive guide to changing the look of your granite countertops without full replacement, combining cost-effective methods, design transformations, and professional techniques:
1. Resurfacing & Refinishing
Polishing/Restoration
Process: Use diamond abrasive pads (50–3,000 grit) with a wet polisher to restore shine. Deeper scratches require professional grinding machines like the HLMJX-12 (12–24 heads) for uniform results.
DIY Kits: Granite-specific polishing compounds (20–50) can buff minor scratches.
Outcome: Revives original color and gloss without altering structure.
Honing
Achieve a matte finish using 220-grit abrasives. Ideal for modern, non-reflective aesthetics.
2. Cosmetic Upgrades
Epoxy or Concrete Overlays
Application: Apply a 3–5mm layer of epoxy/resin over granite. Compatible with marble-look or terrazzo designs.
Durability: Lasts 10+ years; heat-resistant up to 400°F.
Cost: 35–50/sq ft (vs. $100+ for new granite).
Paint & Sealant
Steps:
Degrease with acetone, sand lightly.
Apply stone-specific paint (e.g., Rust-Oleum Countertop Transformations).
Seal with water-based polyurethane.
Best For: Temporary updates; lasts 2–5 years.
3. Structural Modifications
Backsplash Replacement
Tile Removal: Use a heat gun to soften grout, then pry tiles with a putty knife. Protect countertops with plywood.
New Options: Install glass, metal, or peel-and-stick tiles directly over existing backsplash substrate.
Edge Reprofile
Reshape bullnose to waterfall edges using diamond router bits (150–300/professional).
4. Repair & Patchwork
Chip/Fissure Repair:
Materials: Super glue, clear epoxy, or Light Cure Acrylic (food-safe).
Steps:
Clean with pH-neutral soap.
Apply masking tape around the chip.
Fill with color-matched epoxy mixed with granite dust.
Sand with 600-grit paper, polish.
Seam & Adhesive Removal:
Adhesive Removal: Loosen caulk with dental floss, dissolve residue with acetone-soaked cloths.
5. Design Accents
Inlays: Embed metallic veins or crushed glass into epoxy-filled grooves.
Decals: Apply heat-resistant vinyl patterns (e.g., faux marble veins).
Accessories: Use removable trays, runners, or cutting boards for color blocking.
Critical Considerations
| Method | Cost | Lifespan | Risks |
|---|---|---|---|
| Polishing | 100–300 | 5–10 years | Over-grinding dulls stone |
| Epoxy Overlay | 35–50/sq ft | 10–15 years | Peeling if improperly bonded |
| Edge Reprofile | 150–500 | Permanent | Cracking if too thin |
| Paint | 30–100 | 2–5 years | Scratches easily |
Weight Limits: Overlays/add-ons must not exceed cabinet load capacity.
Professional Help Needed For:
Structural cracks or large chips.
Electrical/plumbing modifications near sinks.
Best Practices
Test First: Always trial polishes/paints in hidden areas.
Avoid Harsh Cleaners: Vinegar or bleach degrades sealants and epoxy.
Annual Maintenance: Reseal with solvent-based impregnators (e.g., Tenax Hydrex) to preserve updates.
Conclusion
Transforming granite countertops without replacement is achievable through targeted repairs (chips, scratches), surface refinishing (polishing/honing), or creative overlays. While DIY methods work for minor updates, consult stone specialists for structural changes or complex machinery like PLC-controlled polishers.This approach saves 60–80% of replacement costs while extending your countertop's life by 10+ years.
Hot Tags: gray cabinets granite countertops, China gray cabinets granite countertops manufacturers, suppliers
Previous
Granite Vanity CountertopSend Inquiry


